Wednesday 20 June 2012

WOYWW - 159

Happy birthday to me, happy birthday to me, happy birthday dear meeeeeeeee, happy birthday to me!!


Thirty eight today and planning a marvellous day of inky goodness to celebrate...


I've just finished this month's page in a circle journal for the Rebel Stampers challenge...


Here are some swatch cards I made for the Spring Seasonal Distress Inks from the amazing Tim Holtz, just got to print out and attach the names, I can't decide whether Squeezed Lemonade or Peacock Feathers is my favourite colour...mind you, Shaded Lilac isn't bad either!


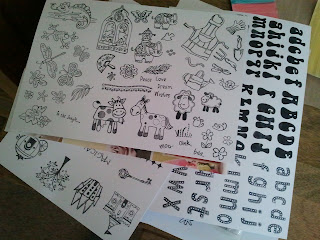
These new stamps have been inked up, stamped on white card stock and are about to be laminated and stored away for reference...


And finally I have been playing with my new storage, they are the divider trays from inside Really Useful Boxes, but when turned on their sides they are a perfect fir for all things Distress...and they even have holes in the corners so I'm hoping to persuade my DH that they could be mounted onto the wall above my desk, how fabulous would that be, to have all my inks just a stretched arm away??


Please hop over to Julia's site and check out more WOYWWers...

Wednesday 13 June 2012

WOYWW - 158

Another week, where do they go?

On my work desk today is the father's day card which, at last, and only just in time, is now finished...

I'm still high on alcohol inks (quite literally at times, they can be quite powerful stuff if you don't have a window open) and  used one of my favourite techniques to make a tartan background which was then stamped on in Jet Black Archival ink. I love this stamp...


The card was covered in multicoloured card which I ran through my fabulous new toy, the Vagabond die cutting and embossing system. I used one of Tim Holtz texture fades and then cut up the pieces, arranging them randomly and fixing them on using the tiny attacher mini stapler...


Got to get this in the post tonight if it stands any chance of getting up to Yorkshire in time for the weekend...


Hope you've had a great week and for more work desks, please check out Julia's blog x

Wednesday 6 June 2012

WOYWW - 157

On my work desk this week is the first card I've had chance to make in ages and it was created using alcohol inks and a technique I learnt from a recent workshop run by the excellent Hels Sheridan at the awesome Stamp Attic.


I had a few alcohol inks but never knew what to do with them...after a day up to my elbows in ink I'm not short of ideas now.


The agate technique is lush and I used the gold mixative to give a wonderful splurgy effect across the background.


The stamp set is of course by Tim Holtz...and I love it.


For more desk-hopping, jump over to Julia's place

Big news just in, my wonderful husband has ordered me a Vagabond for my birthday later this month...so excited :-)


Wednesday 25 April 2012

WOYWW - 151

Another week...where do they go? On my desk today are more piles of crafty stuff...


... more stamps for selling...


...the last lot went really well and I've got loads of lovely ink pads, embossing powders and stains to play with from the money I made. Including some Alcohol inks, yummy...I've already had fun with these on a couple of tags...


...and a couple of birthday cards, one stamped with a gorgeous balloon from Hero Arts, the other made using a die and some funky papers...


Thanks for stopping by and to nosey around lots more workspaces, please hop across to Julia's blog...


Tuesday 24 April 2012

Compendium of Curiosities 2 - Challenge #2

 For the second in the Studio L3 series of Tim Holtz inspired challenges, the technique is "Faux Patina", p.58 in A Compendium of Curiosities, volume II.


A glossy card stock tag was coloured using the Faux Patin technique in Shell Pink, Willow and Cloudy Blue Alcohol Inks with Copper Mixative. The heart boarders are a Hero Arts stamp in Plum Archival Ink and the Framed Boarder stamp was added in Olive Archival Ink. A silver heart was coloured using the Faux Patina technique, this time in Watermelon, Sail Boat Blue and Citrus Alcohol Inks and finished with a piece of ribbon.


Please check out the other entries over at Linda's Blog

Monday 23 April 2012

Sunday Stamper - Week 202

This week's theme is Summer Colours, I have gone for sultry summer pinks with a splash of blue skies...


The manilla tag was inked up in Spun Sugar Distress stain and edged in Aged Mahogany Distress Ink with a blending tool. Hero Arts stamps were then used to create the background in Archival Plum ink. The lovely lady is from PaperArtsy and she was stamped in Jet Black Archival ink. The sentiment, also from PaperArtsy was stamped in Jet Black Archival ink onto glossy card which had been coloured with Broken China Distress Stain. A pink satin bow was added as a finishing touch.

To see more entries to this week's challenge, hop over to Hels blog...

Thursday 19 April 2012

Sunday Stamper - Week 201

Running a bit behind with my challenges this week, but better late than never, here is my entry to the Sunday Stamper, and the theme this week is...men.


The tag background was made using the Archival resist technique on glossy card, covered with Frayed Burlap Distress Ink. The very distinguished gentlemen were then stamped in Jet Black Archival ink. The quote was stamped in Jet Black Archival onto glossy card coloured with Broken China Distress Stain. I used a Cuttlebug die to cut out the little alien spaceship which were then mounted on foam pads.

For more Sunday Stamper entries please check out Hels' fabulous blog


Wednesday 18 April 2012

WOYWW - 150

Happy WOYWW...


This is my desk this morning, lots of piles of stuff going on


My husband operates a strict "one-in-one-out" policy when it comes to stamps and craft supplies in general. There are a few bits and pieces I'm after so to make space I'm selling some old stamps on eBay. I've grouped them into sets and stamped them onto white card in Jet Black Archival, I think this shows them off best. Fingers crossed they sell, I've got my eye on some of Tim's new sets...


My craft basket is full of finished tags from various challenges. I did a couple more sessions of Creative Chemistry 101 with paints, love the white acrylic resist and the crackle paint effects. I have also started the new challenge from L3 Studio, working our way through the second Compendium of Curiosities book, one technique at a time; it was custom foam stamps this time.


Thanks for stopping by and please check out the rest of the WOYWW family at Julia's blog


Sunday 15 April 2012

Compendium of Curiosities 2 - Challenge #1

This is the first of the challenges hosted by the fabulous Studio L3 blog and sponsored by Simon Says Stamp.  The idea is to work our way through Tim Holtz book, A Compendium of Curiosities, Vol.2, one technique at a time...and I can't wait. Challenge one is Custom Foam Stamps. I love this technique and used Tim Holtz Alterations On the Edge die Townscape.


This is my entry to the challenge - Distress Stains were schooshed across glossy card stock and the Townscape stamped in Jet Black Archival ink. I then used an ink splot stamp to add a little interest around the edges. The card was then mounted onto a black tag.


Just to show the versatility of this technique I used the same Custom Foam Stamp to create a totally different effect


Here the Townscape was stamped onto sticky back canvas in white acrylic paint. Once dry, Distress Stains were again swished over the top and the canvas edged in Walnut Stain Distress Ink. The canvas was then mounted onto a Kraft tag.

For more fabulous pieces of art please check out the other entries over at Studio L3...

Thursday 12 April 2012

Sunday Stamper - Week 200

This is only my second entry for the Sunday Stamper but it's a special one...this challenge has now been going for 200 weeks!


The tag was coloured with misted Distress Reinkers in Shabby Shutters, Broken China and Spiced Marmalade. A number stencil was then misted through with Walnut Stain Reinker. The background was then lightly stamped with a mini cog stamp from Paper Artsy. The main number stamps are also from Paper Artsy and these were stamped in black Archival ink onto card which had been coloured with Spiced Marmalade Distress Stain and layered onto green card stock. The 200 number was added with pink gems (blimey, forgotten how fiddly they can be!) and a pink bow tied through the top. I attached an old watch dial with a safety pin as a final embellishment.


For more Sunday Stamper action pop over to Hels, you could even win some blog candy...

Wednesday 11 April 2012

WOYWW - 149

Another Wednesday (already!?!) another whizz around the world courtesy of crafty work-desks...here's mine


I've got a bit of a "monster" production line going on here...it's coming up to a lot of first birthdays with my antenatal mums group and we have a joint party for five of them on Saturday so I am busy putting together some cards.


This basket was part of an Easter gift from a crafty chum and it's great for chucking in half finished projects and things I'm in the middle of. It is mostly full of tags from Creative Chemistry 101...still not even half way through the online course yet!


Here's my lovely stash of buttons, I used to have them all colour coded in little glass bottles but being short of space I tipped them all into one box. It's more hassle to find the button I'm after, but excellent fun to rummage around in.


And here is a scrummy paper stash just waiting to be cut up...


Thanks for stopping by and don't forget to visit all the other WOYWWers


Sunday 8 April 2012

Sunday Stamper - Week 199

I'm still very behind with all my challenges and online workshops. I've missed the deadline for entries to Hel's Sunday Stamper for last week, but thought I would take part anyway...just for fun!

This tag was made using a couple of techniques from Tim Holtz's Creative Chemistry 101 classes. I didn't have the same stamps or embossing folders as he used so I made it up as I went along.


The embossing folders and stamps are all Tim's and Distress Inks were used to colour the background. Right, got to go make another entry for this weeks Sunday Stamper...it's the 200th challenge and there's candy to be won...

Wednesday 4 April 2012

WOYWW - 148

Thanks for all your lovely get well wishes last week...I am so much better now and to prove it, the craft desk is back to its usual state


I'm in the middle of some thank you cards with a new stamp and Promarkers


And I'm also trying to decide what to do with my latest find...


Best news of the week...I received my WOYWW badge from the lovely Julia and it is now proudly displayed on my craft bag...


Thanks for stopping by, be sure to check out all the other WOYWWers at Stamping Ground


Monday 2 April 2012

Ranger Techniques Workshop

A few weeks ago I took part in a fantastic Ranger Techniques workshop run by Hels Sheridan at the Stamp Attic in Wantage. If you ever get the chance to take part in one of Hels' classes you should, they are amazing. I learnt so many fabulous techniques and can now get so much more out of my stash.

When I got home I was so full of inspiration that I put together some ATC's for the monthly Rebel Stampers swap using some of these techniques. Without giving away too many secrets of the class, here are my finished pieces...


This first ATC was made using Distress Embossing Ink and Powder and the card coloured with Distress Ink.


Watermark resist was used to create the background for this ATC. The edges were then decorated with metallic threads and the sentiment stamped, coloured and attached with foam pads.


I used holographic embossing powder to create this fantastic effect, the image was stamped on black paper, mounted onto white card then attached to glossy card which had been brayered with a rainbow of distress inks then stamped in black with a sequin waste image.


For the final ATC, Perfect Pearls were painted onto the image which had been stamped and embossed onto black card. This was then cut out and layered onto glossy card prepared as for the previous ATC. Black lines were then doodled around the edges.


Looking forward to my next class...an alcohol ink techniques workshop on May 13th with Hels at the Stamp Attic


Thursday 29 March 2012

WOYWW - 147

What a sorry looking sight...an empty craft desk


Sorry for the late post, I've been an ill bunny for the last few days so no crafting this week, not even had the strength to watch any Creative Chemistry 101 videos since last Friday and am now many, many days behind. Instead I thought I'd show you where I keep all my stash.


I love the Really Useful Boxes...they stack and pack so well and I can see through them so don't have to pull everything out to find the stamp I'm looking for.


Thanks for looking and for more WOYWW madness, please hop over to Julia's place...

Friday 23 March 2012

Architecture ATCs

A couple of ATCs for the monthly swap I take part in on the Rebel Stamper forum. The theme was Architecture and after rummaging around in my stamp box I found one of the Eiffel Tower. Is it just me or does it look more like Blackpool...


I used Tim's brushless watercolour technique for this first ATC, as described in Day Two of his amazing Creative Chemistry 101 online workshop. The image was stamped onto watercolour paper and when dry the text was stamped in black. A fleur-de-lys rub on was applied to a small Tim Holts fragment piece and attached to the card with Glossy Accents.


For the second ATC I used the Tissue Wrap College technique again. The background was stamped with French Script in black permenant ink then covered with a light splattering of PVA glue. Green tissue paper was squiggled over the top making sure wrinkles were created. Once dried, Bundled Sage Distress Ink was swiped over the top to make the wrinkles pop and the edges were inked with Walnut Stain Distress Ink. The Eiffel (Blackpool?) Tower was then stamped in Olive Archival Ink and the tower detail cut out, leaving a white boarder. This was then layered over the tag with foam pads.


Day 5 of CC101...can't wait to see what Tim has for us today!

Wednesday 21 March 2012

WOYWW - 146

In the middle of a few projects again...but mostly enjoying Tim Holtz new online workshop; Creative Chemistry 101. One of his finished tags takes pride of place on my craft mat, surrounded by lots of supplies. I'm loving this course and learning how to do techniques properly that I've been messing around with for ages and never quite getting right!


This is a close-up of my "Distress-Ink-foam-applicator-storage-device" a.k.a two pieces of laminated card with sticky-back velcro. 

Unfortunately I don't have the money or space for 36 applicator tools with dedicated foam pads so I printed out Tim's handy colour swatch guide and laminated it. Then I drew grid lines on another piece of paper to fit 36 foam applicator pads and laminated this too. I attached sticky back velcro to the grid boxes and now I can stick my colour specific foam pads down alongside the reference table. 

Its really useful because I can then store it in a ring binder or magazine rack and it is always easy to grab. Something else I noticed was that it makes me see which colours I go for the most and encourages me to use others...

Worn Lipstick and Spicy Marmalade look to be my favourites while poor old Dried Marigold, Old Paper and Pumice Stone have been rather neglected...


For more WOYWW shenanigans pop along to Stamping Ground